 Skewered Fencing
Quick Start Guide
Download the Quick Start Guide (pdf) that comes with new boxes. Print double-sided, trim along the dotted lines, and fold in 4. It will fit in the shipping box under the scoring box.
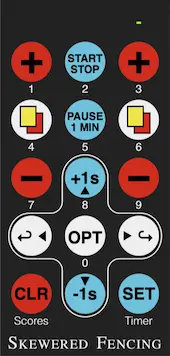
Physical buttons
There are three buttons on the box: a red button and two white buttons.
The red button has three functions:
- A quick press will cycle through the weapon modes.
- A long press will enter/exit the configuration menu on the box. This is primarily useful to set the strip ID by pairing a remote.
- A very long press (5s or more) will reboot the scoring box into firmware upgrade mode. Once this is entered, it will remain in firmware upgrade mode until the firmware is uploaded or the box is rebooted.
The two white buttons navigate and adjust the configuration menu: the left button moves up (or decreases a value) and the right button moves down (or increases it). Together with the red button (which acts as OPT/select inside the menu), this lets you configure the box on its own, with no remote needed. Outside the menu the white buttons do nothing.
The two white buttons may also be held down when the box is powered on to immediately enter firmware-update mode as a recovery mechanism.
Configuration Menu
Long press the red button on the box or long press the OPT button of a paired remote to enter the configuration menu. Once in the config menu, use OPT to select items and CLR to exit items or CLR again to leave the config menu.
You can also operate the menu using only the box's own buttons, with no remote: the red button acts as OPT (select an item, then select again to finish editing it) and a long press leaves the menu, while the left white button moves up or decreases a value and the right white button moves down or increases it. This lets you configure the box — including enabling Bluetooth and setting the Strip ID — without a remote.
The configuration items are:
- Strip
The strip ID of the box which defines which remote it will respond to. See Pairing a Remote. - Remote
The last received charge level of the remote, usually in 5% increments. This cannot be changed. - EpeeAuto
Whether to auto-increment the score when a hit occurs in Epee (only while the clock is running). - Passive
Controls what happens when the passivity shot clock expires (foil and epee only; saber does not have a passivity clock). This can be set to:- Stop: The bout clock stops and further touches are blocked when the passivity threshold is exceeded — similar to when the period expires. The passivity state clears when a P-card is given, the clock is restarted, reset, or manually adjusted. The box beeps and the passivity clock flashes.
- Cont: The bout continues normally after the passivity threshold is reached. The passivity indicator will flash but the clock keeps running and touches are still accepted.
- SaberPer
Whether to display the period indicator for Saber. - Tone
The buzzer frequency in Hz (2700 - 3300). This can be useful if you have multiple boxes near each other. - Vol
The box volume (Off / Low / Medium / High). - Btn Beep
Whether to make an audible chirp every time a remote button press is received. - StartSnd
Whether to sound an audible signal when the bout clock is started. This can be used instead of the director saying "fence!" or "allez!". - Self Ref
Allow fencers to start the bout clock and increment scores without using the remote. When enabled, if both fencers short their weapons to their lamés (foil and saber) or hold their blades together (any weapon) for at least 600ms then the box will beep once to acknowledge and then start the clock with a double beep after a short random delay (1.5 - 3.5 seconds for lamé shorts, 2 - 4 seconds for blade contact so fencers can return to their lines). Fencers can also increment the score for their opponent by shorting to their own lamé for 3 seconds. The box will emit warning chirps for the final 1.5 seconds to notify fencers and prevent accidental scoring. - Timing
The timing standard used for lockout windows, passivity thresholds, and default clock durations. This can be set to:- FIE: Standard FIE timing. Lockout windows are 300ms (foil), 170ms (saber), and 40ms (epee). The passivity threshold is 60 seconds. The default bout clock is 3:00 for all weapons.
- WFL: World Fencing League timing (according to preliminary reports). Lockout windows are shorter: 200ms (foil), 100ms (saber), and 40ms (epee). The passivity threshold is 45 seconds. Default bout clocks vary by weapon: 2:00 (foil), 1:00 (saber), 3:00 (epee).
- Custom: Your own lockout windows. When Custom is selected, a "configure >" row appears below the Timing item and opens a per-weapon editor: select a weapon and type its lockout time in milliseconds as three digits (for example 2-5-0 for 250ms). The values are remembered, even when switching to another timing mode and back. Everything else (passivity, default clocks) follows FIE.
- Timeline
Whether to display the hit timeline. This can be set to:- Off: The timeline is never shown and not available, even for review.
- Live: The timeline is always shown with live strip interactions being constantly shown.
- Hit: The timeline is shown only when a touch occurs.
- HitTimes
How much extended hit-timing information to display:- No: Late and short hits are not shown at all.
- Late: Late hits, whipovers, and short hits are shown with their timing. This is the default.
- All: Additionally, on a double touch the second light shows how many milliseconds after the first hit it landed, so fencers can see how close the double was to the lockout.
- Rot
Whether to rotate the display 180 degrees. This can be useful if the box is mounted upside down. - L/R Swap
Swap the left / right fencer connections. This can be useful if the box is mounted upside down. - Live Vid
This is for integration with an external video replay system. It will indicate that the video replay system should display continuous live video (instead of only showing replays). - Bluetooth >
Enable and manage wireless Bluetooth connections to the box. See Bluetooth below. - System Info >
Select this option to show the serial number and current firmware version of the device. - Update >
Select this option to show the current firmware version and optionally reboot into firmware update mode via USB. If you choose to reboot into update mode, you may exit without updating turning power off and back on.
Remote
Remote ID (Strip ID)
Each remote stores the Strip ID that it is configured for. Boxes and remotes are initially configured as "Strip 1". Scoring boxes will only respond to signals from remotes that have the same Strip ID as the scoring machine. To change the ID for a given remote, press and hold the SET button and PLUS button on the opposite corner for 5 seconds until the green LED flashes several times quickly. Then enter a two digit strip id (01 - 99). The green LED will flash quickly again when the new ID is set.
Charging
The remote is powered by an internal rechargeable battery. The battery should last 1-2 months of typical usage. When necessary, recharge the battery by connecting it to a standard USB-C charger.
Pairing a Remote (Setting the Strip ID)
To pair a remote with a customized strip ID (see above) with a box, do the following:
- Long press the red button on the box to enter config mode.
- While config mode is active and the option is on strip id, it will detect any remote. Press the OPT button on the remote twice to set the new strip ID to the remote's ID.
- Press CLR on the remote several times to exit config mode.
Bluetooth
The box continuously broadcasts its state over Bluetooth so nearby devices can follow the bout. Turning on BT Enable in the Bluetooth menu additionally lets up to three devices connect directly to the box at once. A connection is one of two kinds:
- Unpaired connections are read-only: they can listen to the box's state (score, clock, lights) but cannot control it.
- Paired connections can also send remote commands to the box. A paired device is clearly indicated on the box — a "BT REMOTE" banner appears when it connects (showing the device's name, if it has set one), and a small blue dot at the bottom right of the screen stays lit while it is connected.
Pairing is secured with an on-screen PIN, and is only accepted while the box is in the Bluetooth menu, so a stray device nearby can never quietly pair with your box. Up to 5 paired devices are remembered across power cycles.
Pairing a device
Use the Skewered Fencing app for Android to connect to a box (an iOS version is in the works). To pair:
- On the box, enter the config menu and open Bluetooth, then set BT Enable to Yes.
- In the app, select your box to connect. The box displays a six-digit PIN.
- Enter that PIN in the app to complete pairing. The box shows a "BT REMOTE" banner once the device connects.
Bluetooth menu items
- BT Enable
Whether to allow devices to connect directly to the box. The box broadcasts its state either way; this controls direct connections. - Paired >
The list of remembered (paired) devices, most recently used first, shown by name (or the last four characters of the device's address if it has no name). Select Clear All at the bottom of the list to forget every paired device. - PIN
The six-digit pairing code, shown only while a device is pairing (otherwise "---"). This cannot be changed. - Active
How many devices are currently connected, shown as used / total (for example, 1/3). This cannot be changed.
If wireless goes offline
Scoring never depends on Bluetooth — a wireless problem only affects the Bluetooth link, never the bout. If the wireless radio ever gets stuck, the connected dot turns into a slowly breathing red marker. Simply open the config menu and the box restarts the radio for you; the restart is fast enough to be seamless, leaving you in the menu with wireless back online.
Updating the scoring machine firmware
To update the firmware of the scoring machine, follow these steps:
- Download the desired firmware version to your computer. Do not alter the name of the firmware file.
- Connect a micro-USB cable from your computer to the micro-USB port at the bottom of the back of the machine. If the scoring machine is powered off, it will turn on when the USB cable is connected.
- Enter the menu and select "Update" and then "Yes".
Note: If necessary, there is also a recovery mechanism for entering firmware update mode: hold down the two white buttons when powering on the box. - On the computer, a USB drive named "RPI-RP2" should show up.
- Copy the firmware file to the "RPI-RP2" drive. Once it finishes copying, the drive will automatically disconnect and the scoring machine will restart with the updated firmware.
- In some cases, the saved configuration will be reset after an update. Press and hold the same button on the scoring machine (the button further from the power switch) for 1 second to enter configuration, then press "OPT" on the remote twice to register the remote. You may also have to navigate the config menu to adjust the screen rotation.
Firmware releases
- Build 591 (2026-07-19) →
download 💾
- Blade contact in Epee & other strip sensing improvements: Epee now detects and shows blade contact, and will also show shorts between the tip wires and the guard. Both saber body-cord lines (B and C) are now monitored, so a touch registers via whichever line is intact. A single-wire break still shows the fault light but no longer blocks the touch. The strip sampling is more robust to ambient EMI noise by taking multiple measurements at each sample.
- Custom Hit Timing:
The Timing setting gains a Custom option with per-weapon lockout windows, editable in milliseconds right in the config menu. Other behavior (passivity, default clocks) follows FIE. - Double-Touch Timing:
The HitTimes setting is now three-way (No / Late / All). All additionally shows how many milliseconds after the first hit the second hit of a double landed, inside the second light. - Self-Start by Blade Contact:
Fencers can now trigger the self-start (see Self Ref) by holding their blades together for 600ms, in addition to shorting to their lamés. This makes self-start practical in epee. A blade-contact start waits slightly longer (2-4 seconds) so fencers can return to their lines. - Foil & Epee: Short Hits Shown:
Contacts too brief to register (under 14ms on-target in foil, under 2ms in epee) are now latched and displayed with their duration, just like saber whipovers. - Misc minor improvements: The config menu uses a new compact font and now shows five rows at a time instead of four. The lockout period is centered in the timeline view. Bluetooth apps can now send any remote button press. Eliminated a rare display glitch where the image could come up horizontally shifted and wrapped.
- Build 529 (2026-06-27) →
download 💾
- Bluetooth Remote Control:
The box can now be controlled over Bluetooth, not just observed. Up to three devices can connect at once — unpaired connections follow the bout read-only (like a wireless repeater), while paired devices (like a phone) can also send commands and are clearly indicated when connected. Connect with the Skewered Fencing app for Android (an iOS version is in the works). See Bluetooth for setup.
NOTE: Bluetooth is still evolving and the protocol may change between releases. - Smoother Display, Better Slow-Motion Video:
The display engine was rewritten to refresh continuously in the background, more than doubling the frame rate to over 450 fps. This eliminates the rolling "banding" lines that cameras can pick up in slow-motion video. - Configure Without a Remote:
The two white buttons now navigate and adjust the configuration menu directly on the box, so you can change settings — including enabling Bluetooth and setting the Strip ID — without a remote. See Configuration Menu. - Fix: Restored the ability to view the timeline during the one-minute break.
- Bluetooth Remote Control:
- Build 465 (2026-04-28) →
download 💾
- Timeline Review Shows Touches:
When reviewing the timeline after a touch, the scoring lights now indicate the type of hit that triggered the touch (valid, off-target, or late) as a small overlay at the bottom of the valid light area. This makes it easier to understand what happened at a glance when reviewing the last touch, but it doesn't interfere with new touches registering or showing. - WFL Foil: No Off-Target:
In WFL timing mode, foil off-target hits are now ignored. Off-target will still be visible in the timeline, but no longer stops the action.
- Timeline Review Shows Touches:
- Build 459 (2026-04-21) →
download 💾
- Manually set passivity:
In foil or epee, holding down SET the first time already allows setting the time as M:SS. But now holding down SET again will allow explicitly setting the two digit passivity timer.
- Manually set passivity:
- Build 450 (2026-04-06) →
download 💾
- WFL Timing Mode:
Added a configurable timing mode (FIE / WFL) in the config menu under "Timing". The default is FIE with all of the standard weapon times. In addition, a new preliminary WFL mode is added that uses shorter lockout windows (foil 200ms, saber 100ms), a 45-second passivity shot clock (vs FIE's 60s), and default bout times of 1 min for saber, 2 min for foil, and 3 min for epee.
NOTE: To prevent any possible accidental usage of non-FIE timing modes, the display shows a scrolling "NON-FIE TIMING" banner and uses a tweaked color scheme: amber stopped clock and purple scores. - Passivity Stop:
A new config option "Passive" (Stop / Cont) controls what happens when the passivity shot clock expires. When set to "Stop" (now the default behavior), the bout clock stops and further touches are blocked — similar to when the period clock expires. The passivity state clears when a touch occurs, a P-card is given, the clock is restarted or reset. The "Cont" option behaves as before where the passivity clock simply changes color when exceeding 60s. - Fix: Eliminated intermittent buzzing noise when idle.
- Fix: Fixed a bug where an expired clock could be incorrectly encoded as a break timer in the serial protocol. Removed some invalid event transmissions.
- Repeaters: Improved serial stability and display reliability.
- WFL Timing Mode:
- Build 406 (2025-10-30) →
download 💾
- ‼️ Improved Saber Whipover Detection:
Saber whipover detection was missing some situations and would not properly reject whipovers during longer parries. It will now catch these and reject whipovers properly. - ‼️ Fix Epee Auto Scoring Double Touch Bug:
In rare circumstances, Epee Auto Scoring would detect and display a double touch but only award a single touche for the score (instead of awarding a double touch). This would only occur if the second touch was within 1ms of the cutoff and even then in only about 20% of occurances. It is now fixed for all timings. - Improve P-Cards:
- P-cards are now drawn as tiny P-shaped cards instead of rectangles. This helps distinguish them from normal cards.
- P-cards are now always granted and cycled for both fencers simultaneously (rather than individually).
- Display improvements: Color representation has been improved, especially with dimmer colors. This has allowed the display frame rate to increase to 200 fps, which improves the display quality in recorded videos.
- Fix: Stop buzzing sound. The system would previously sometimes make a buzzing sound when idle. That has been eliminated.
- ‼️ Improved Saber Whipover Detection:
- Build 350 (2025-06-12) →
download 💾
- Reduce Mistakes: This release focuses on reducing mistakes
and making the box simpler and more intuitive. In addition to Undo
(below), several minor improvements were made:
- When the bout clock is running, operations such as changing the weapon mode, clearing scores, or resetting the clock are blocked. If one of these is pressed, the clock will flash red to indicate that the operation cannot be done.
- When reviewing the timeline for a touch, pressing CLR or SET will exit the timeline view instead.
- New Feature: Undo. A long-press of white ↩️ (left) button
triggers undo. The box now keeps a history of recent inputs and
allows undoing operations. In particular:
- If you accidentally clear the scores, undo will restore the scores.
- If you accidentally start a one-minute break and lose the lock, Undo will restore the clock.
- If you accidentally reset the clock, undo will restore the clock. If you reset the clock during the one-minute break, it will restore the "on break" status and continue counting down.
- Reduce Mistakes: This release focuses on reducing mistakes
and making the box simpler and more intuitive. In addition to Undo
(below), several minor improvements were made:
- Build 325 (2025-04-14) →
download 💾
- New Feature: Bluetooth support for SFS integration! This release provides the initial bluetooth broadcasting support so that the Super Fencing System iOS App can connect to Skewered Fencing Boxes. Please note that the bluetooth protocol is still in development and may change.
- Build 321 (2025-03-27) →
download 💾
- Improvement: Direct time entry shows 0:0x values more clearly.
- Removed: Pre-start warning ticker option for self-ref is removed. The warning ticker to donate a point to the opponent remains.
- Build 319 (2025-03-24) →
download 💾
- New Feature: Direct entry for bout clock! Previously, a long press of the SET button would reset the timer to 1:00. Long-pressing the SET button now allows you to directly type in a time in M:SS format. By default it's set to 1 minute, but using the button numbers you can enter any time from 0:00 to 9:59. Pressing SET or CLR will immediately accept the currently-displayed time.
- Build 316 (2025-03-24) →
download 💾
- Improvement: The timeline now marks whipovers. Whipovers are also saved for review like touches.
- Build 314 (2025-03-23) →
download 💾
- New Feature: Allow showing the timelne only when a hit is
made. The timeline now has three options:
- Off: The timeline is never shown and not available, even for review.
- Live: The timeline is always shown with live strip interactions being constantly shown.
- Hit: The timeline is shown only when a touch occurs.
- Update: When the timeline is not disabled, the review may be started either from the most recent portion (by pressing the back button) or the earliest captured portion (by pressing the forward button).
- New Feature: Allow showing the timelne only when a hit is
made. The timeline now has three options:
- Build 310 (2025-03-21) →
download 💾
- New Feature: Allow reviewing the timeline for the last touch as well as scrolling back in time to see more. After a touch, press the white ↩️ button to view the most recent touch timeline. Press ↩️ again to scroll further back, and press ↪️ to scroll forward in time. Scrolling forward to the end will stop the review and restore the live timeline.
- Build 309 (2025-03-21) →
download 💾
- New Feature: Add self scoring and rename "Self Clk" to "Self Ref". Fencers can now donate points by shorting to themselves for 3 seconds. This is also a temporary "Ticker" option to indicate that self start is engaged.
- Build 292 (2025-03-07) →
download 💾
- New Feature: Add config menu option "Self Clk" to allow fencers to start the clock themselves by shorting to their lamés.
- Build 274 (2025-02-18) →
download 💾
- UI: Show the weapon mode when turned on.
- Config menu: Show remote charge level right under strip id.
- New Feature: Add config menu option "Btn Beep" to beep for each remote button press.
- New Feature: Add config menu option "StartSnd" to beep when the clock starts.
- Build 250 (2025-01-30) →
download 💾
- Fix: Show ground light on epee if a fencer's A-C lines are shorted.
- Remote: Final production version of remotes include battery level monitoring and colored LED indicator for the battery level (green flash = >40%, yellow = 20-40%, red = <20%).
- Config menu: Display charge level of remote battery for production remotes.
- Config menu: Add system info display to show serial number and firmware level.
- Internal: Add a quick firmware update mode sequence: hold the two white buttons when powering on to immediately enter firmware update mode at startup.
- Internal: Increased display framerate to minimize flicker on recorded videos.
- Build 228 (2025-01-13) →
download 💾
- UI: Center scores move penalty cards to outside (P-Cards still on inside).
- UI: Fix buzzing when 1 min break timer expires.
- UI: Flash the clock when time has expired (either break or normal).
- Config menu: Add firmware update screen, showing current build.
- Internal: Revamp serial communication for Favero repeater adapter and video replay support.
- Build 201 (2024-11-06) →
download 💾
Fix two bugs related to Favero repeater lights via the prototype adapter:- In foil, after the lockout period off-target hits would light up the white light momentarily like in saber instead of being locked out. This is now fixed.
- When the box went to sleep the repeater lights would stay on. They should now turn off.